
Architecture
Common Mistakes When Photographing Abbey Interiors (and How to Avoid Them)
September 26, 2026
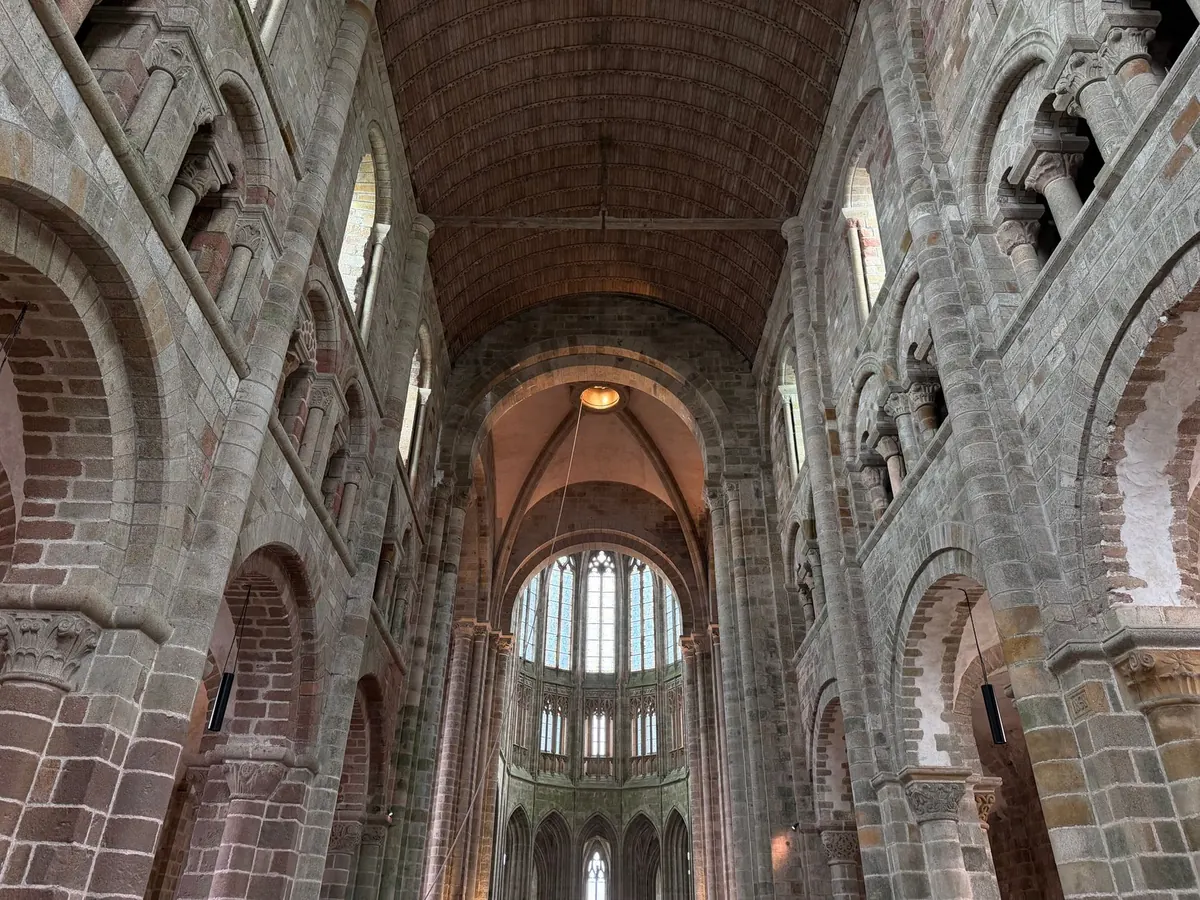
You step into the nave, light is falling in sheets across the flagstones, and the whole building seems arranged for the photograph you are about to take. Then you get home, open the files, and find grey mush in the shadows, windows like blank white paper, and columns leaning as though the abbey had been drinking. None of that is bad luck. It is a small set of predictable mistakes, and most of them are easy to correct once you can name them.
Church and cloister interiors are among the hardest everyday subjects in architecture photography. The brightness range is huge, the geometry is unforgiving, and the building has its own rules about what you may carry through the door. Work with all three and your pictures improve on the next visit, not in six months.
Read the Light Before You Choose a Shutter Speed
The first mistake is pointing the camera at the altar and trusting the meter. An abbey hands you two exposures at once: the bright world of the windows and the dim world of the stone, and no single frame holds both comfortably. Decide which one matters. If the glass is your subject, expose so the window keeps its colour and its leadwork, then let the surrounding stone go dark. Deep shadow feels right in churches. Grey, lifted, detail-free shadow does not.
Switch on the highlight warning and check the histogram after every few frames. If a large patch of window is blinking, you are losing the glass. Bracket three frames two stops apart when windows fill the frame; you can choose the best one later, or blend two if you edit that way. A window that reads as clean white with a hint of colour is often the honest result, but a window with no tracery left at all is a lost opportunity.
Metering off the wrong thing is the other half of the problem. A spot reading from a plain piece of pillar, neither the brightest nor the darkest surface in view, gives a sensible starting point. Shoot raw, and set white balance yourself, to daylight or with a custom reading. The mix of daylight through the glass, candles and old tungsten floodlighting makes auto white balance wander from frame to frame, and correcting that in a batch is tedious.
Tripods and Access: Know the Rules Before You Unpack
A tripod solves the low-light problem and creates a new one: it turns you into an obstacle. Many churches allow tripods on quiet weekdays and ban them on Sundays, during services, and in busy cloisters where visitors are constantly moving through. Some ask for a small photography fee or a permit for professional work. A two-minute conversation at the welcome desk saves an argument later, and stewards are usually generous when you ask first.
- Carry the tripod. Do not drag or wheel it across old tiles and ledger stones.
- Set up against a column or at the edge of an aisle, never in the middle of the walking line.
- Drop the legs. Most beginners work at eye level; a lower camera makes columns taller and shows the vaulting properly.
- Keep your bag closed and out of the path of anyone using a stick, a wheelchair or a pushchair.
- Stop shooting if a service begins, and do not photograph worshippers' faces without asking. That applies twice over to children and to anyone at prayer.
If tripods are not allowed, brace the camera on a pew back, a folded jacket, a bean bag or a windowsill. Handheld, raise the ISO, open the aperture, use stabilisation if you have it, and squeeze the shutter on the exhale rather than stabbing at it.
Why Flash Almost Never Works in a Nave
Flash is the obvious answer and almost always the wrong one. A ceiling twenty metres above you gives nothing to bounce from, so the burst lands on whatever is nearest: the pillar in front of you, the back of a head, the end of a pew. Everything beyond it stays dark, and the arcade you came for disappears. Add the colour problem, cool flash against warm candlelight and yellow floodlight, and the foreground looks pasted in.
Most churches ban flash outright, and reasonably so. It damages the atmosphere of a quiet afternoon, distracts other visitors and can be a real concern near fragile textiles and painted surfaces. Never move a candle or a votive stand for a photograph, and never lean anything against a wall that has survived six hundred years without your help.
Work with what is already there. An open west door is a softbox: stand so that daylight falls across the floor and along one side of the nave, and the near stone picks up shape. Candle flames make excellent accents, isolated against dark stone with a wide aperture and a slightly faster shutter. Mixed light is not always an enemy; a blue window above an orange lamp can be the whole point of the picture. Shoot raw and decide later how far to neutralise it.
Composition Errors That Show Up in Every Batch
Verticals come first. Tilt the camera back to fit in the roof and the columns lean inward, a distortion called keystoning that no viewer reads as deliberate. Keep the sensor plane upright instead: level the camera, use a wider lens, accept a strip of floor at the bottom, and crop afterwards if you need to. If you have a shift lens or perspective correction in your editing software, use it, but expect to lose the edges of the frame when you do.
Then symmetry. A nave is one of the few subjects that rewards a dead-centre composition. Line the camera up on the middle of the aisle, get it genuinely central, and the arches stack like a corridor. That is the safe shot, and it is worth taking properly before you take risks. Break the symmetry on purpose afterwards, with a single figure, a chair, or flowers on a plinth.
Some other habits worth breaking:
- Cutting arches at the frame edge. Include the whole arch, or crop decisively into a detail.
- All ceiling, no floor. Angling down a little gives the eye somewhere to stand.
- Shooting only from the back pew. Walk to the altar and turn around, look at the west door, try the transept.
- Forgetting layers. A near bench, a middle arch and a far window hold a picture together.
- Placing your subject against a column line, where it vanishes into the architecture.
Cloisters and the Details You Walk Past
Cloisters are often the best part of a visit and the most photographed badly: four galleries, repeated arches, flat light, and the same wide shot taken by everyone. Watch the direction of the light along the walkway. Raking afternoon light grazing the stone does far more for texture than a frontal view, and shooting along the arcade rather than across it lets the arches overlap into depth. Include the worn step, the garth grass, light pooling on the floor.
Then slow down and look at small things: corbels and capitals, floor tiles, hinges and ironwork, a carved bench end, initials scratched into a pillar by someone bored in 1780. Get close. A wide lens a handspan from a carving often has more presence than a long shot from across the room. Look for frames within the building too: a doorway with the altar beyond it
Photo: Cristian T / Pexels
Related posts
More stories you’ll love reading